What is Git and GitHub?
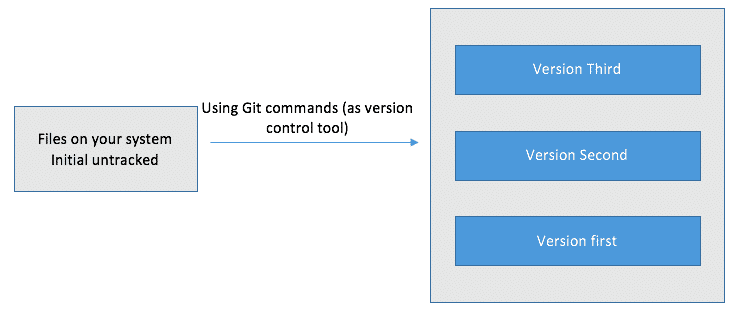
When it comes to Git and Github, most people get confused and think that both are more or less the same thing but, Git is a free and open source distributed version control system whereas GitHub is an online hosted platform for various services that I will explain you in the below section of this article. Now, you would be thinking what is version control? lets us understand this by a simple diagrammatic example shown below.
Suppose, initially, you created a file say ABC.txt within a folder on your system. Using the concepts of version control, you can manage, track, commit changes, roll back to a previous safe state and much more easily. In the above diagram, the local file can be converted to trackable files i.e a version control system using Git commands. Why is version control Important? While programming and as a human, it is our tendency to make mistakes and then land up ourselves in a position from where coming back to original state is not possible and we are lost. Using version control, we can track and control our huge files full of codes very easily and quickly.
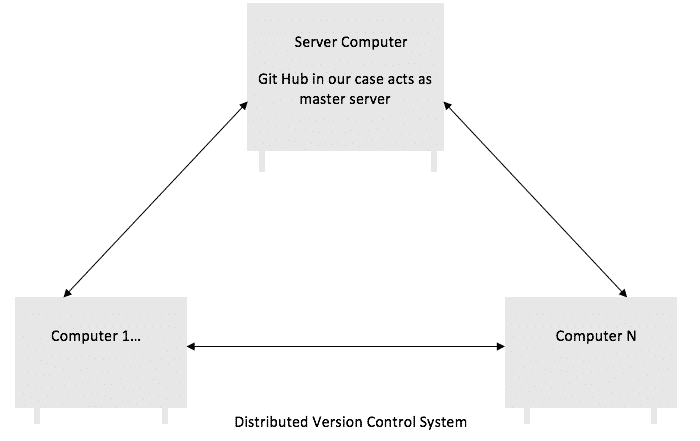
There are basically three type of version control system i.e. Here, I am only interested in local version control system and distributed version control system, using Git command to manage and manipulate them and then adding those files to remort version control hosted site such as Github for distributed VC.
So, hope you must have understood what is Git and GitHub? GitHub is a hosted platform i.e online server where you can create a repository, push the local repository that you have created using git commands on your personal computer, start a branch, write comments, open a pull request and much more. Also, Read: 5 Best Github Alternatives for Programmers and Developers
Basic Git Commands
There are several Git commands but, I have highlighted some of the important ones, that a beginner should be familiar with those are:
1. Git Config
It is the command used to configure the name and email of the user. For eg.
2. Git init
This command is used to create a git local repository of your file and then you can start tracking the changes you make in the future. This command initializes an empty git repository inside the same directory that you are currently in with .git extension eg. of code on the terminal
3. Git Status
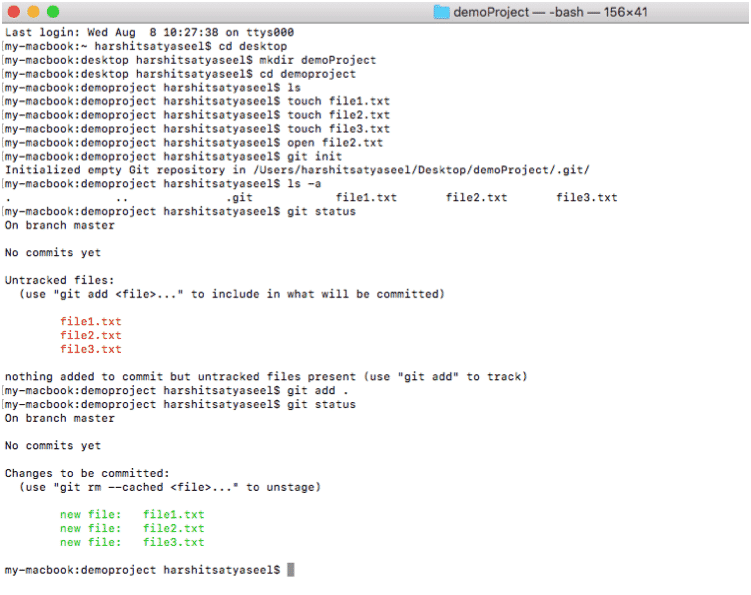
This command is used to show you the untracked files in your working directory. Between file and local git repository, there is an intermediate area called as a staging area. Untracked files are those files that are not under version control and will be shown in red color on the terminal. Command is.
4. Git Add
This is the command used to add the untracked file to tracking status, of the current directory, so that you can keep tracking of your modifications. See the demo code below. Till now we have done the following as shown in the figure below. I have used mac computer to demonstrate you, and some basic mac terminal commands which are more or less similar to Window command line commands. I hope you all would be familiar with some of the basic terminal commands. I have created a demoproject using mkdir command on the desktop directory. I have created 3 files named as file1, file2, file3 using touch command. Then, they have been initialized using the git init command and at the initial stage they all are untracked and shown in red color in the screenshot. To track them, I have used git add command and then they are shown in green color.
5. Git Commit
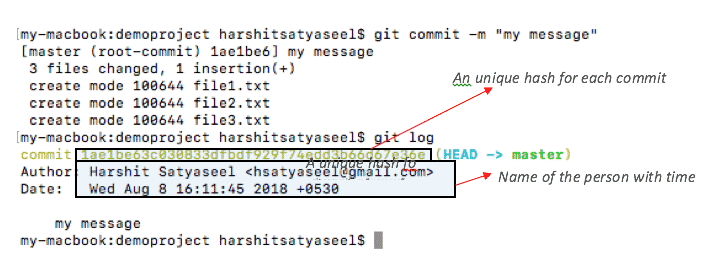
This command is to commit the changes in your file in the existing local git repository. See the figure below.
6. Git Log
This is the command used to see the changes or commits that you have made to your files. See the figure below. The hash shown in the highlighted section above uniquely identifies the particular commit that you make with the author name and time as well.
7. Git Diff
Suppose, you had a file and you made some changes in a hope that you are doing well and saved it and then closed the file. When you opened your file, you saw, the changes were not working as expected and then you wanted to see what changes you made. Well using git, you can do this by using the git diff command.
8. Git Checkout
Once you see the changes, and if you want to roll back to the previous one then this command is used.
9. Git Remote Add origin
This command is used to link up the GitHub account to your local git repository.
10. Git Push -U Origin Master
This command pushes your local repository to the remotely created Github’s repository using the U flag/option.
Setting up GitHub & Pushing your Local Repository
Head over to https://github.com/ and sign up if you don’t have an account by providing your username, email, and password. Once done, you need to verify your email id.
You will be directed to guide page where +sign is shown on the top corner as shown in the figure below.
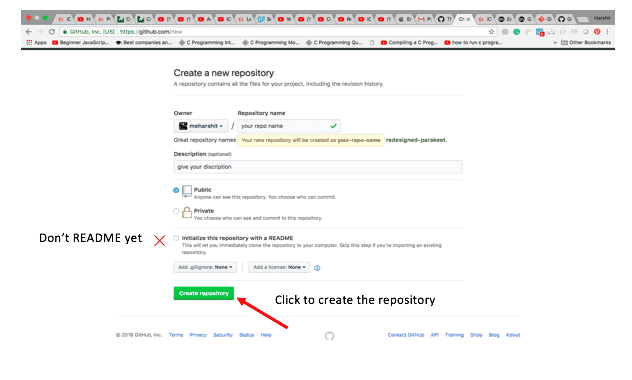
Now follow the following steps as shown in the figure.
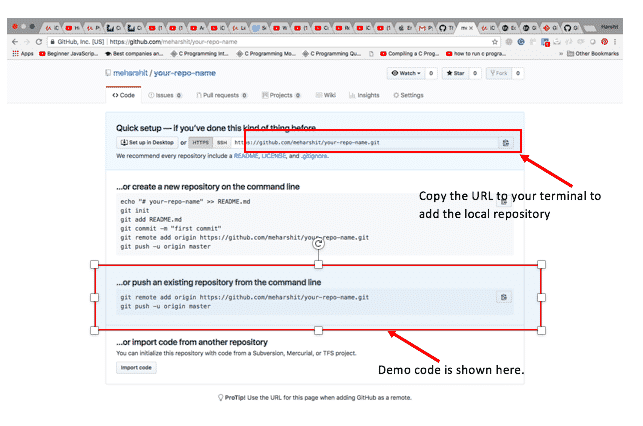
Now, we want to push our local repository to the GitHub. So,
use git remote add origin command as shown above and copy your GitHub account URL shown in the red box and then use git push -u origin master command. It may ask you for your username and password so, provide them and press enter and that’s it, your local repository will be uploaded to the GitHub’s server.
Now, your terminal should show you something like the above figure. When you go to your GitHub account, you can see the pushed file.
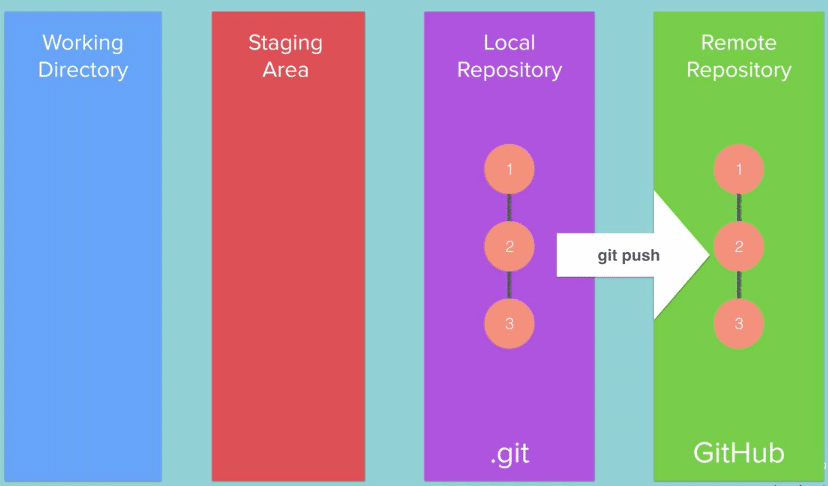
A summary diagram.
