No matter how your data on the external drive has been deleted, the fact that you lose the files is there, so it is in need to perform external drive recovery now. When we search for data recovery, we always are noted that please stop to use the device before successful recovery. Why? In fact, the deleted data will not be removed from our device at first after deleting. The data is saved somewhere on the device but we cannot find it directly in a common way. However, once you input new data inside the hard drive, the newly-input data will overwrite the deleted items. At this time, the lost files will be gone forever and we cannot get them back. Thus, stop to use the USB drive, memory card, or other external hard drives when you find data loss. Method 1. Retrieve Files from USB/External Hard Drive Using Command Prompt Command prompt in CMD helps us to solve lots of Windows problems. In this case, it is really practical to use CMD for data recovering.
Connect the USB drive, Pen drive, Memory card, etc. to the computer. Press the “Windows” + “R” key and input “cmd” to call for the CMD interface. Or you can directly click the search icon in the taskbar and enter “cmd” for searching. In the “cmd.exe” window, enter chkdsk F: /f (Replace F: with the drive letter of your external drive.) and press “Enter: key. Type: Y and hit “Enter” to continue. Finally, type “F: > attrib -h -r -s /s /d [drive letter]:. “, and then, hit “Enter”.
Method 2. Perform External Drive Recovery with FonePaw Data Recovery (No Experience Required!) To recover deleted photos, videos, audio, documents, and more from the USB/external drive, FonePaw Data Recovery is an actionable way. It can not only restore the lost files from external hard drives, but it also works for data recovery from Windows and Mac computers. It supports to recover up to 100 data formats, including the widely-used formats: PNG, JPG, GIF, PSD, MP4, MOV, MP3, DOC, DOCX, XLSX, ZIP, RAR, PST and more. Plug your external hard drive: USB flash drive, memory card, digital camera, Pen Drive via the USB port into the computer and check whether your computer can detect it. Note: Because installing software may influence the data being written, please install FonePaw Data Recovery on the hard drive which didn’t save the deleted data before. As for external drive recovery, you cannot install it on the connected drive.
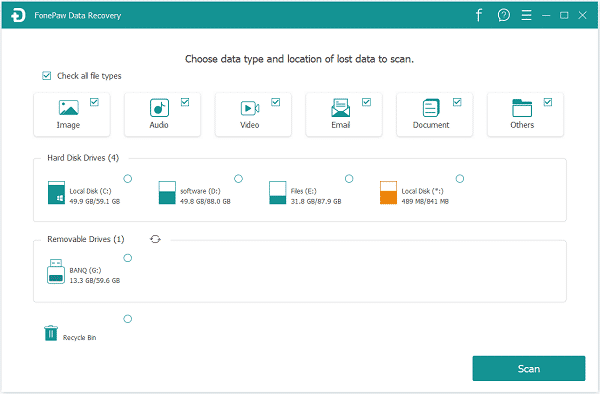
Install and open the professional data recovering software on your computer. When its homepage comes to you, you will see the disks and the supported data types. You are able to select certain file types and hard disk to get started, like Photos, Videos, Documents. If you need all data, tick the box in front of “Check all file types”. Besides, select your drive in Removable Drives to go scanning.
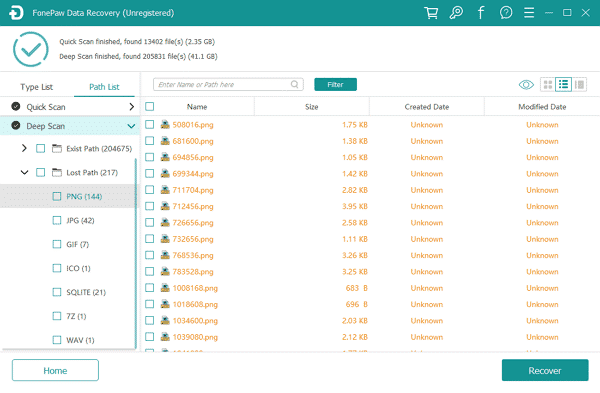
Tip: It is compatible with recovering from Recycle Bin only. The program will detect your data with Quick Scan mode. If you cannot find what you need, you can move to Deep Scan mode which will take a little long time but it can find more files.
All the results will be showed in the Type List and Path List. In the type list, the files are categorized by data types. In the path list, the files are displayed according to their paths.
The searching box allows users to filter items by name and path. When the deleted files are found, click the Recover button to get the data back. The recovered data can be saved on the computer or external hard drive.
Conclusion
Even though there are many ways to recover deleted files on the hard drive, we still need to pay attention to data storage lest the data get lost. Actually, the success rate of data recovery depends on many elements so sometimes the data will be deleted permanently. It is suggested to take periodic data backup, which will avoid a load of troubles.


